Creating a Soil Profile
This page describe the field protocol for characterizing soil sites and profiles. Video demonstrations follow. For your reference, you may want to download the complete text field protocol, available via the links below:
- Field Protocol for Characterizing Soil Sites and Profiles (pdf)
- Field Protocol for Characterizing Soil Sites and Profiles (doc)
In order to understand why we find certain plants, mammals, insects and microbes at our soil sampling sites we need to characterize the physical environment these organisms live in. We will do this by:
- Describing the natural and human features of the site where we will dig a soil pit, and
- Dig a soil pit that exposes a soil profile that can be described by its horizon types, moisture, color, smell, texture, and structure.
Collecting data about the soil site and profile can help scientists draw correlations between the physical environment in the soil and the biological community of organisms that inhabits the soil.
Materials
Required:
- Field data notebook
- Pen or pencil (optional: colored pens or pencils)
- Shovel or other digging tool for digging a pit
- Trowel or metal spoon for taking small soil samples (called peds)
- Plastic tarp or sheet for storing soil removed from the pit
- Spray bottle full of water
- Meter stick or tape measure
- Camera
Optional:
- Colored pens and pencils
- Gloves, may help with digging or allergies
- Site map from previous module
- Soil sieves
- Hammer
- Vinegar
- Munsell color charts
- Small plastic ruler
- Plastic vials and rubbing alcohol to store soil invertebrates
Directions
- Identify a location within your field site where you can dig a soil pit. Look for less compacted and disturbed areas of soil away from concrete, pavement or roads. The presence of grasses, trees and other types of vegetation are usually a good indicator that you can dig a successful pit. Look for and avoid safety risks like broken glass or other sharp objects that may be obscured by grass. At most sites you will want to have any buried public facilities marked so you can avoid digging them. Call or e-mail at least 5 days before you dig! (1-800-424-5555, www.callbeforeyoudig.org)
- In your field notebook, describe characteristics of the site that could influence the soil profile. This includes features like:
- vegetation types, percent of coverage and heights
- land use (urban, agricultural, recreation, wilderness, etc.)
- buildings or other artificial features (fences, roads, benches, power poles, etc.)
- surrounding landforms and water bodies
- approximate slope of the site and exposure to sun and shade
- Using your shovel, dig a pit that is at least 1 meter (3 feet) deep. The pit should be wide enough that you can easily observe the different layers (horizons) of soil all the way to the bottom of the pit. Usually this means digging a pit that is as wide as it is deep.
- As you remove soil from the pit with the shovel, place the soil on your plastic tarp in piles that correspond with the soil layers and depth. When you are finished with your soil profile you will replace the piles into the pit so that the deepest horizons are returned to the bottom of the pit and the surface horizons are used to cap the top of the pit.
- Starting at the top of the profile and working your way down to the bottom of the profile, determine the types of soil horizons (O, A, E, B, C, R) present and the depths at which horizons are located. Discuss the types and depths of horizons as a group until consensus is reached. Take depth measurements at the top and bottom of each horizon using a meter stick or tape, starting with 0 cm at the top of the profile. Make a sketch of the profile horizons types and depths in your field notebook. Take a photograph of the profile that clearly shows the horizons. Take another photograph(s) of the landscape surrounding your soil pit.
- Examine each horizon for moisture, color, smell, texture, and structure (see notes on each on the following pages). In order to determine these characteristics you can examine both the exposed profile in the pit and the soil you collected from horizons and stored on the plastic tarp. Describe these characteristics for each horizon in your notebook.
- Refill your soil pit and pick up any equipment you have used. As much as possible, return the site to the condition it was in before you dug the pit.
Here are some tips on how to describe different soil characteristics:
Moisture – We will describe soil moisture by feeling soils between our fingers to tell if they are either dry (you can’t feel any moisture in the soil), moist (the soil feels damp), or wet (the soil feels saturated).
Color and smell – We will describe soil color and smell very qualitatively (subjectively). If your soil is dry, you will need to use your spray bottle of water to wet the soil in order to best observe the color and smell. Work with your group to come up with different adjectives to describe the colors and smells you observe in each horizon.
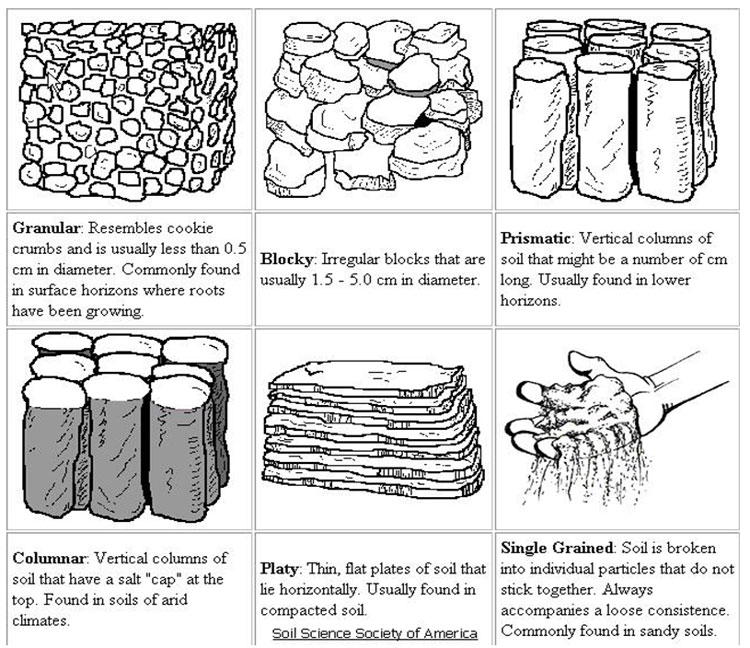
Structure – We will describe the general structure, consistency, and presence or absence of rocks, roots and animals in each horizon of our profile.
General structure of the soil can be described as:
Consistency of the soil can be described as loose (falls apart in your hand), friable (soil peds break apart easily between your fingers), firm (soil peds break apart under pressure and leave dents on your fingers), or extremely firm (peds can only be crushed using a hammer).
Describe the presence of rocks (mineral fragments 2 mm or larger) and roots as none, few or many. (Optionally, you can measure the actual number and size of rocks and roots exposed using a small plastic ruler.)
Describe any animals (worms, insects, snails, rodents, etc.) or traces of animals (channels, burrows, nests) you observe and if there were none, few or many of each kind of animal or animal trace.
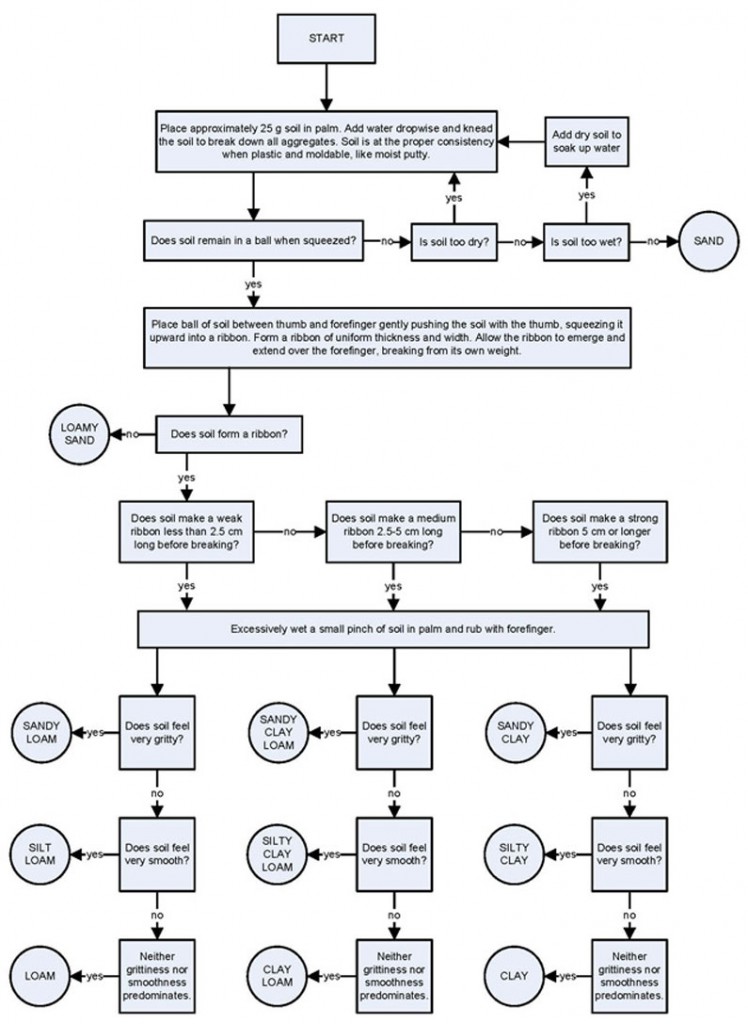
Texture – Soil texture is the proportion of different fine-earth (less than 2 mm in size) fractions in a soil sample. These fine-earth fractions include sand, silt and clay. Sand is the largest particle size (~0.1-2 mm), and is the only fraction visible to the naked eye. Silt particles (~0.04-0.1 mm) are smaller than sand but bigger than clay. Clay is the smallest particle size (~0.04 mm or smaller) and is essentially microscopic. Loam is the term used to describe soils that have relatively equal amounts of sand, silt and clay. We will use the “feel” method to determine soil texture using the flow diagram on the next page:
We will use the “feel” method to determine soil texture using this flow diagram:
(Note: The following videos are fairly quiet, so you may want to make sure that the volume on your computer is up [in Windows it is usually controlled by double-clicking on the small speaker icon in your taskbar at the lower right corner of the screen], and also that the volume knob on your computer speakers is up. Or use headphones!)
Soil Core
In this short video, Dr. Michelle Anderson demonstrates how to take a soil core sample.
Right-click or ctrl-click this link to download.
Digging Tips for a Clean Profile
In this video, Dr. Michelle Anderson offers tips and a demonstration for how to dig a soil pit for a soil profile.
Right-click or ctrl-click this link to download.
Removing the Profile
In this video, Dr. Michelle Anderson demonstrates the removal of a soil profile.
Right-click or ctrl-click this link to download.
Basic Analysis
In this video, we see a basic analysis of a soil pit and profile.
Right-click or ctrl-click this link to download.
Final Thoughts
In this video, Dr. Anderson offers suggestions for conducting soil profiling with students.
Right-click or ctrl-click this link to download.
Plating a Soil Sample
In this video, Dr. Marisa Pedulla shows us how to plate a soil sample.
Right-click or ctrl-click this link to download.

