Mapping With Google Earth
Required Materials
- Computer with Google Earth downloaded to the desktop
- Notebook (or sheets of drawing paper)
- Pencils or pens
What is Google Earth?
Using a computer, Google Earth lets you view the Earth and explore galaxies in the sky above using satellite imagery, aerial photographs, and maps. It allows you to use your mouse, keyboard or trackball to navigate the world.
Google keeps a GIS database of high resolution satellite imagery and aerial photographs it gets from providers like NASA and commercial satellite companies. From this pool of images, Google chooses the “best” shots – those with the sun overhead to reduce the impact of shadows and with no clouds or pollution haze. Shots are generally updated every 2-3 months or less.
Once in the database, the image is formatted to fit the geographic grid system of coordinates used by Google Earth. Once this is done you can use Google Earth to locate the latitude and longitude of nearly anywhere in the world and view a high resolution image of that place. We will be using Google Earth to look at images of the field site we sketch mapped and determine the latitude and longitude of the site. We will compare the site features, dimensions and scale from our field map to the information available with the Google Earth image. For more on Google Earth imagery, click here.
The activity that follows will provide a brief introduction to Google Earth and how it may be used in the classroom. For additional educational ideas that employ Google Earth, click here.
To download Google Earth, and for complete information on the software package, click here.
In this brief activity, we will explore some of the features of Google Earth.
To Begin
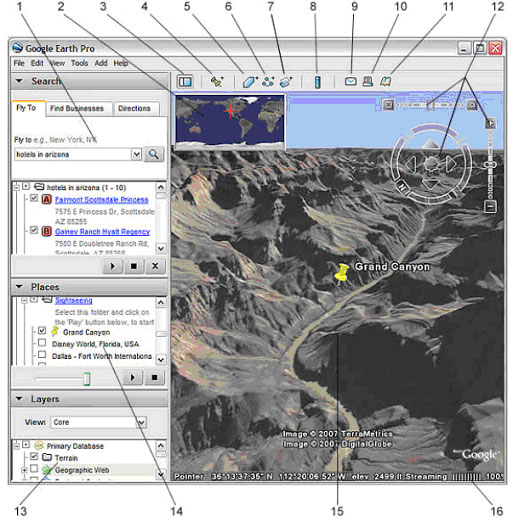
Click on the Google Earth icon on your computer’s desktop, or go to Start>Programs and click on Google Earth. This should open up to the Google Earth website (see Figure 1.21 below). We will explore the following Google Earth tools listed on this figure: search panel (1), measure (8), e-mail (9), navigation controls (12), layers panel (13), 3D viewer (15), and status bar (16).
- Search panel – Use this to find places and directions and manage search results. Google Earth EC may display additional tabs here.
- Overview map – Use this for an additional perspective of the Earth.
- Hide/Show sidebar – Click this to conceal or the display the side bar (Search, Places and Layers panels).
- Placemark – Click this to add a placemark for a location.
- Polygon – Click this to add a polygon.
- Path – Click this to add a path (line or lines).
- Image Overlay – Click this to add an image overlay on the Earth.
- Measure – Click this to measure a distance or area size.
- Sun – Click this to display sunlight across the landscape.
- Sky – Click this to view stars, constellations, galaxies, planets and the Earth’s moon.
- Email – Click this to email a view or image.
- Print – Click this to print the current view of the Earth.
- Show in Google Maps – Click this to show the current view in Google Maps in your web browser.
- Navigation controls – Use these to zoom, look and move around.
- Layers panel – Use this to display points of interest.
- Places panel – Use this to locate, save, organize and revisit placemarks.
- Add Content – Click this to import exciting content from the KML Gallery.
- 3D Viewer – View the globe and its terrain in this window.
- Status bar – View coordinate, elevation, imagery date and streaming status here.
Next we will complete a series of simple tasks to give us some practice using the Google Earth tools.
Task #1

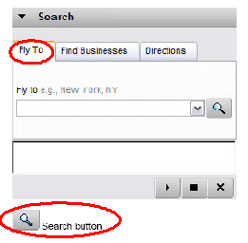
Figure 1.22: The Search dialog box can find specific named locations via the Fly To tab, and can also be used to Find Businesses and Directions.
On the upper left side of the Google Earth screen you will see a Search dialog box with three tabs labeled “Fly To”, “Find Businesses”, and “Directions” (see Figure 1.22). Have the dialog box open to the Fly To tab.
In the open space, enter the name of your school and then click on the Search button. If Google Earth can’t locate your school, do another search using the name of the nearest town. In a moment you will learn how to use the navigation and zoom tools to find your school.
Once an area near your school is displayed in the 3D viewer, you can move your view in any direction (north, south, east, or west) by either:
- Using your mouse, position the open hand cursor
 anywhere on your view and press the left/main mouse button. The open hand cursor will change to a closed hand
  that you can use to pull the view in any direction, as if the hand was pulling the map into a new view to the north, south, east or west.
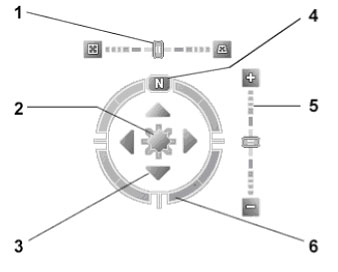
 - Use the navigation controls (described in Figure 1.23) to move in a given direction, as well as zoom in and out.
-
Use the tilt slider to tilt the terrain toward a horizon view. Move the slider to the left for a top-down view or to the right for a horizon view. Double click the icons at the end of the slider to reset the tilt all the way to a top-down view or to a horizon view.
- Use the joystick to move the center point of the view down, up, right or left. Click the center, hold the mouse button, and move in any direction.
- Click the direction arrows to move the view in the direction you wish.
- Click the north up button to reset the view so that north is at the top of the screen.
- Use the zoom slider to zoom in or out (+ to zoom in, – to zoom out). Double click the icons at the end of the slider to reset the zoom all the way in or out.
- Click and drag the navigation ring to rotate the view.
Task #2
Practice using the hand drag and navigation methods of moving around. Find your way from your field site to another location nearby, like your house or the nearest highway. Explore the landscape around your field site by zooming in and out and tilting the terrain up and down. Identify and list in your notebook natural and anthropogenic features near your field site that may influence your studies:
- Mountains, forests, streams, lakes, fields, etc.
- Residential, commercial, or institutional buildings, airports, gas stations
- Highways, city streets, unpaved roads, trails, bridges, parking lots
- Cemeteries, athletic fields, golf courses, mines, logging areas, landfills, oil and gas drilling, grazing lands, feed lots, croplands, dams, etc.
Geographic Grid Location
On the bottom of your screen you will see a status bar (see Figure 1.24). This is where you can find information on latitude, longitude, and elevation of different points in your view.
Task #3
Use your mouse and navigation controls to zoom into your field site. Place the cursor in the middle of the site. Record the latitude, longitude and elevation in your notebook.
Layers
Layers include useful information that can be added or made to disappear from your view. The most useful layers are the:
- Roads (highways, county roads, streets, etc.)
- Borders and labels (county and state boundaries, city and state names)
- Places of interest (schools, airports, hospitals, recreation areas, etc.)
- As well as different map and photo views
You can turn layers on and off by clicking inside the box next to a layer. When the layer is shown in the view, you will see a checkmark in the box next to the layer. When the layer is not shown, the box will appear unchecked.
Task #4
Turn the different layers on and off. How does this change your perspective of the field site? Decide on the set of layers that shows the greatest amount of information about your site without obscuring any features. E-mail a copy of this shot to yourself by clicking on the “e-mail” icon ![]() in the toolbar at the top of your screen. Send the picture in an attachment as a “graphic of 3D view”. This sends an actual image file to your e-mail. If you do not have e-mail, you can print the image instead by choosing the “print” icon just to the right of the e-mail icon. Select the option to print a graphic of the 3D view on medium resolution.
in the toolbar at the top of your screen. Send the picture in an attachment as a “graphic of 3D view”. This sends an actual image file to your e-mail. If you do not have e-mail, you can print the image instead by choosing the “print” icon just to the right of the e-mail icon. Select the option to print a graphic of the 3D view on medium resolution.
Measuring Distances
Let’s measure the length and width of your field site, as we have in our field sketch map.
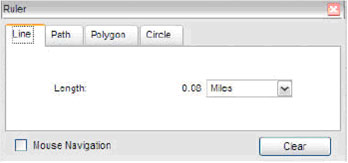
Click on the ruler icon in the toolbar at the top of your view screen. Or you can open the Tools menu and click on the Ruler item. Either action will open the Ruler window (see Figure 1.25).
In the map view, be sure you can see the two points on the map you want to measure between. Be sure you are viewing the map from top-down, not at a tilt, and with the terrain layer off. This will allow you to make the most accurate measurements. This works best because measurements are based on the latitude and longitude coordinates and do not consider elevation.
In the Ruler dialog box, be sure you have the Line tab open, as in the box shown above.
Choose a unit of measurement: centimeters, meters, kilometers, inches, feet, yards, miles, or nautical miles.
Click on the point you would like to measure from and a red dot will appear. A yellow line will appear as you move the cursor to the point you are measuring to. The distance between the two points will appear in the Ruler dialog box.
Task #5
Using the ruler tool, measure the length and width of your schoolyard. Record these measurements in your notebook. Can you tell if the distances between objects reported in Google Earth are the same as distances you recorded? To find out, use the ruler to measure between two features on the Google Earth image that you can also easily identify on your field map, like the distance between two buildings. Are the distances between the two features the same on your field sketch map and on Google Earth?
Now you should be familiar with the basic features of Google Earth. Many different activities and lessons that incorporate Google Earth can be found through a simple online search. For more, view the sample activity included below.
Questions for Thought:
- How are Google Earth maps similar to your field site map?
- How are Google earth maps different from your field site map?
- Do these two approaches complement each other? Why or why not?
- Could Google Earth be a useful tool in your classroom?


